Monday 31 October 2011

3d Flowers

This is my first attempt at 3d flowers.
Both were cut using the sizzixs eclips, flowers cartridge.

The poinsettia was glued with tacky glue and shaped using tweezers.
And the edges were glittered with white fine glitter. 


The blue flower was cut and the edges distressed using distressing ink.

 A circle of lace was added to the middle.

And it was all held together using a pearl brad.

Sunday 30 October 2011

First Christmas Candle

This is my first attempt at putting an image onto a candle.
I must say, that I am very pleased with it, though in future, I need to experiment with a low heat setting to prevent the candle from melting.


An image on each side, both out of the LOTV christmas 2010 range.


I think I may add some glitter and faux snow before I send it.
The candle, is scented with clean linen and smells lovely.
Both images were stamped onto one sheet of tissue and coloured with pro markers.
They were then heat set into the candle.

Saturday 29 October 2011

Belated Birthday Card

This was a last minute belated birthday card, made for my neighbor.
I do love this stamp, its so useful.


Paper distressed using Tim Holtz ink

Lillie of The Valley image coloured using pro markers.
Flowers cut and shaped from Eclips.

Printed inside the card.

Monday 10 October 2011

Autumn leaves

Todays card was made for the inspiration challenge over on Docrafts.
It is Tilda rolling in the leaves and kicking them everywhere.

Tilda is coloured with promarkers, but I have used chalks for the background and the leaves.
The leaves where cut from the Flowers Phrases card on the Sizzix Eclips.

The leaves are shaped and stand out, with a light shimmer on them to look like frost.

The sentiment is in gold to match the leaf colours and I have used ribbon and lace to compliment the brown shade.

Tuesday 20 September 2011

Repurposed wine box


This is a piece I did last year, so excuse the rubbish photos and such.

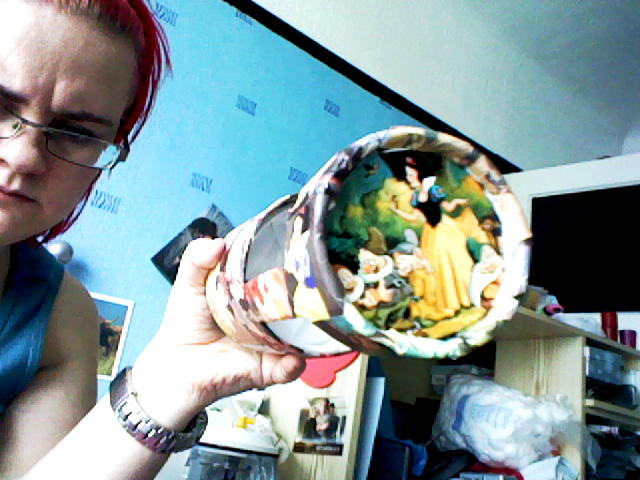
I needed a display type gift box to use for a present and could not find any that fitted. So I began with a cheap round wine gift box.


I peeled all the paper off to reveal the cardboard underneath. I then cut 3 windows in the box using a craft knife.

The gift was a Snow White ornament and I managed to find a snow white picture book in my local charity shop.

The hardest part was destroying the book as it looked to be from the original release of the film and I have been bought up to never tear books hehe.

After cutting the pieces up I stuck them around the box, making sure to cover all blank spaces as well as the inside of the box.


I found the picture that matched the ornamentand made it into a feature on the top of the box.

The quote that went with the ornament went into the lid of the box along with witch.
I then varnished the box with a PVA diluted with water. This gave it a little bit of a shine and made sure everything was stuck and sealed.


I had a small round silver gift box underneath that I was able to write a message to the recipient and put into the box along with another small present.

The box was perfect and gave a unique finish to the present. It was well received.

My biggest tip if you decide to do anything similar, is to make sure that you peel off the original paper fully. It had a gloss feel to it and made sticking anything over it difficult on the areas I missed. 

If I were to do it again, I would probably still do the same thing, but I think I would like to finish it with a high gloss finish.

Sunday 11 September 2011

Friday 9 September 2011

Race for Life Card

This card was created for a teenager who lost her mum to breast cancer a few years ago.
She was running the race for life and had raised approx £300 I think.
This was a congratulary card I made for her.


Saturday 16 July 2011

Tilda Sunset

Well this is my first 'proper' card.
By that, I mean, its the first one that I have made and thought about as I was making it. I have maybe made 2 or 3 cards before, but where I had made one element of the card (be it a ready made decoupage or a picture) and just kind of stuck it to the front of a card. 

Overall, I pleased with how it turned it. Please do tell me what you think in the comments. 

The sunset background was created on white card using coloured chalks.
The Alphabet was a sizzix die.


I used Tilda with bare feet Stamp and coloured with Pro Markers and white glitter.


The flowers were created using a flower punch

The corner was cut using Nellie Snellen Die.

I would like to enter this card into the following challenges.